Цель статьи
В Интернете доступно некоторое количество статей по настройке антивирусной защиты в связке squid + ClamAV, но нет полного материала по настройке полной связки под CentOS 7. В рамках данной статьи будет показан процесс настройки прокси сервера со следующими возможностями:
- фильтрация сайтов и ссылок по категориям;
- антивирусная защита.
Аудитория
Системные администраторы Linux

Введение
Большая часть операторов связи сейчас уже предоставляют маршрутизируемый доступ в Интернет, где фильтрация и антивирусная защита входящего траффика несколько более проблематична. В случаях, когда требуется ограничить пользователям доступ к определенным сайтам по категориям или по URL, а также требуется реализация проверки входящего веб-трафика, то в этом варианте использование прокси сервера является самым простым решением.
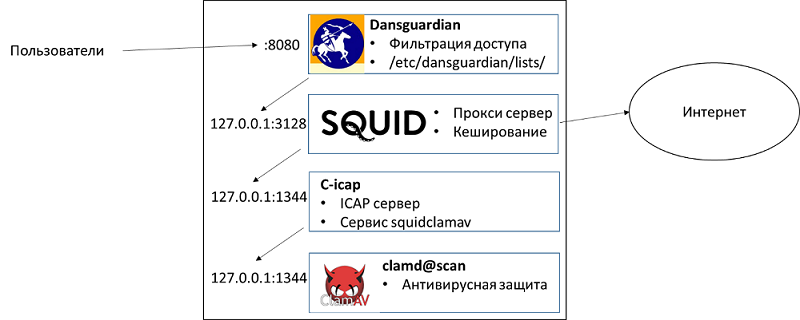
Squid на сегодняшний день является наиболее функциональным прокси сервером, который поддерживает большое количество возможностей. Для реализации антивирусной защиты предлагается использовать ClamAV – открытая реализация средств антивирусной защиты. Фильтрация контента по категориям будет реализована средствами Dansguardian.
Общая диаграмма решения схематично отражена ниже:

Исходные данные
У нас есть Linux сервер под управлением CentOS 7. Сервер имеет маршрутизируемый доступ в Интернет.
Базовая настройка squid
- Обновляем пакеты в системе
# yum update –y
# reboot (если требуется)
- Подключаем EPEL репозиторий, который нам понадобится для дополнительных пакетов
# yum -y install epel-release- Устанавливаем пакеты для squid
# yum -y install squid- Настраиваем конфигурационный файл /etc/squid/squid.conf (никакие изменения не требуются на данном этапе). Детальная настройка squid (ACL, авторизация и тп) находится за пределами данной статьи. Здесь мы используем конфигурационный файл, предоставляемый
пакетом по умолчанию
# egrep -v "^$|^#" /etc/squid/squid.conf
acl localnet src 10.0.0.0/8     # RFC1918 possible internal network
acl localnet src 172.16.0.0/12  # RFC1918 possible internal network
acl localnet src 192.168.0.0/16 # RFC1918 possible internal network
acl localnet src fc00::/7       # RFC 4193 local private network range
acl localnet src fe80::/10      # RFC 4291 link-local (directly plugged) machines
acl SSL_ports port 443
acl Safe_ports port 80          # http
acl Safe_ports port 21          # ftp
acl Safe_ports port 443         # https
acl Safe_ports port 70          # gopher
acl Safe_ports port 210         # wais
acl Safe_ports port 1025-65535  # unregistered ports
acl Safe_ports port 280         # http-mgmt
acl Safe_ports port 488         # gss-http
acl Safe_ports port 591         # filemaker
acl Safe_ports port 777         # multiling http
acl CONNECT method CONNECT
http_access deny !Safe_ports
http_access deny CONNECT !SSL_ports
http_access allow localhost manager
http_access deny manager
http_access allow localnet
http_access allow localhost
http_access deny all
http_port 3128
coredump_dir /var/spool/squid
refresh_pattern ^ftp:           1440    20%     10080
refresh_pattern ^gopher:        1440    0%      1440
refresh_pattern -i (/cgi-bin/|?) 0     0%      0
refresh_pattern .               0       20%     4320
- Запускаем squid
# systemctl enable squid
Created symlink from /etc/systemd/system/multi-user.target.wants/squid.service to /usr/lib/systemd/system/squid.service.
# systemctl start squid
Настройка сервисов антивирусной проверки ClamAV
- Устанавливаем необходимые пакеты
# yum install clamav clamav-update clamav-scanner clamav-scanner-systemd -y- Правим конфигурационный файл.
Здесь
# diff -u /etc/clamd.d/scan.conf.orig  /etc/clamd.d/scan.conf
--- /etc/clamd.d/scan.conf.orig 2016-07-19 22:39:26.247090604 +0300
+++ /etc/clamd.d/scan.conf      2016-07-20 02:18:16.753828514 +0300
@@ -5,13 +5,13 @@

 # Comment or remove the line below.
-Example
+#Example

 # Uncomment this option to enable logging.
 # LogFile must be writable for the user running daemon.
 # A full path is required.
 # Default: disabled
-#LogFile /var/log/clamd.scan
+LogFile /var/log/clamd.scan

 # By default the log file is locked for writing - the lock protects against
 # running clamd multiple times (if want to run another clamd, please
@@ -63,11 +63,11 @@
 # This option allows you to save a process identifier of the listening
 # daemon (main thread).
 # Default: disabled
-#PidFile /var/run/clamd.scan/clamd.pid
+PidFile /var/run/clamd.scan/clamd.pid

 # Optional path to the global temporary directory.
 # Default: system specific (usually /tmp or /var/tmp).
-#TemporaryDirectory /var/tmp
+TemporaryDirectory /var/tmp

 # Path to the database directory.
 # Default: hardcoded (depends on installation options)
@@ -82,7 +82,7 @@

 # Path to a local socket file the daemon will listen on.
 # Default: disabled (must be specified by a user)
-#LocalSocket /var/run/clamd.scan/clamd.sock
+LocalSocket /var/run/clamd.scan/clamd.sock

 # Sets the group ownership on the unix socket.
 # Default: disabled (the primary group of the user running clamd)
@@ -98,7 +98,7 @@

 # TCP port address.
 # Default: no
-#TCPSocket 3310
+TCPSocket 3310

 # TCP address.
 # By default we bind to INADDR_ANY, probably not wise.
@@ -106,7 +106,7 @@
 # from the outside world. This option can be specified multiple
 # times if you want to listen on multiple IPs. IPv6 is now supported.
 # Default: no
-#TCPAddr 127.0.0.1
+TCPAddr 127.0.0.1

 # Maximum length the queue of pending connections may grow to.
 # Default: 200
показана разница с оригинальным файлом
- Создаем необходимые файлы для работы
# touch /var/log/clamd.scan
# chown clamscan. /var/log/clamd.scan- Настраиваем обновление антивирусных баз
# diff -u /etc/freshclam.conf.orig /etc/freshclam.conf
--- /etc/freshclam.conf.orig    2016-07-19 22:47:25.195704610 +0300
+++ /etc/freshclam.conf 2016-07-19 22:47:57.103230225 +0300
@@ -5,7 +5,7 @@


 # Comment or remove the line below.
-Example
+#Example

 # Path to the database directory.
 # WARNING: It must match clamd.conf's directive!
@@ -14,7 +14,7 @@

 # Path to the log file (make sure it has proper permissions)
 # Default: disabled
-#UpdateLogFile /var/log/freshclam.log
+UpdateLogFile /var/log/freshclam.log

 # Maximum size of the log file.
 # Value of 0 disables the limit.
@@ -48,7 +48,7 @@

 # This option allows you to save the process identifier of the daemon
 # Default: disabled
-#PidFile /var/run/freshclam.pid
+PidFile /var/run/freshclam.pid

 # By default when started freshclam drops privileges and switches to the
# "clamav" user. This directive allows you to change the database owner.- Обновляем базы
# freshclam
ClamAV update process started at Tue Jul 19 19:48:31 2016
main.cvd is up to date (version: 57, sigs: 4218790, f-level: 60, builder: amishhammer)
connect_error: getsockopt(SO_ERROR): fd=5 error=111: Connection refused
Can't connect to port 80 of host database.clamav.net (IP: 208.72.56.53)
Trying host database.clamav.net (64.6.100.177)...
WARNING: getfile: daily-21724.cdiff not found on database.clamav.net (IP: 64.6.100.177)
WARNING: getpatch: Can't download daily-21724.cdiff from database.clamav.net
WARNING: getfile: daily-21724.cdiff not found on database.clamav.net (IP: 64.22.33.90)
WARNING: getpatch: Can't download daily-21724.cdiff from database.clamav.net
Trying host database.clamav.net (150.214.142.197)...
WARNING: getfile: daily-21724.cdiff not found on database.clamav.net (IP: 150.214.142.197)
WARNING: getpatch: Can't download daily-21724.cdiff from database.clamav.net
WARNING: Incremental update failed, trying to download daily.cvd
Downloading daily.cvd [100%]
daily.cvd updated (version: 21933, sigs: 441430, f-level: 63, builder: neo)
Downloading bytecode-279.cdiff [100%]
Downloading bytecode-280.cdiff [100%]
Downloading bytecode-281.cdiff [100%]
Downloading bytecode-282.cdiff [100%]
Downloading bytecode-283.cdiff [100%]
bytecode.cld updated (version: 283, sigs: 53, f-level: 63, builder: neo)
Database updated (4660273 signatures) from database.clamav.net (IP: 69.12.162.28)- Проверяем, что работает
# wget http://www.eicar.org/download/eicar.com
# clamscan --infected --remove --recursive eicar.com
eicar.com: Eicar-Test-Signature FOUND
eicar.com: Removed.

----------- SCAN SUMMARY -----------
Known viruses: 4654877
Engine version: 0.99.2
Scanned directories: 0
Scanned files: 1
Infected files: 1
Data scanned: 0.00 MB
Data read: 0.00 MB (ratio 0.00:1)
Time: 8.958 sec (0 m 8 s)- Запускаем демон
# systemctl start clamd@scan
# systemctl enable clamd@scan
Created symlink from /etc/systemd/system/multi-user.target.wants/clamd@scan.service to /usr/lib/systemd/system/clamd@scan.service.- Активируем автоматические обновление баз
# vi /etc/sysconfig/freshclam

Удаляем записи
### !!!!! REMOVE ME !!!!!!
### REMOVE ME: By default, the freshclam update is disabled to avoid
### REMOVE ME: network access without prior activation
FRESHCLAM_DELAY=disabled-warn   # REMOVE ME
Сборка пакетов под CentOS 7 (на другой рабочей станции)
Я не смог найти пакетов c-icap, squidclamav и danguardian в стандартных репозиториях для CentOS 7. По этой причине пришлось собрать из src.rpm пакетов. Сборка производилась на другой рабочей станции. Разумеется, сборку под root лучше не производить.
- Собираем c-icap
# wget ftp://ftp.pbone.net/mirror/ftp5.gwdg.de/pub/opensuse/repositories/home%3A/Kenzy%3A/packages/CentOS_7/src/c-icap-0.3.5-3.1.src.rpm
# rpm –ivh c-icap-0.3.5-3.1.src.rpm
# rpmbuild -bb /root/rpmbuild/SPECS/c-icap.spec- Собираем dansguardian
# wget ftp://ftp.pbone.net/mirror/ftp5.gwdg.de/pub/opensuse/repositories/home%3A/Kenzy%3A/packages/CentOS_7/src/dansguardian-2.12.0.3-1.1.src.rpm
# rpmbuild -bb /root/rpmbuild/SPECS/dansguardian.spec- Собираем squidclamav
# wget ftp://ftp.pbone.net/mirror/ftp5.gwdg.de/pub/opensuse/repositories/home%3A/Kenzy%3A/packages/CentOS_7/src/squidclamav-6.11-2.1.src.rpm
# rpmbuild –bb /root/rpmbuild/SPECS/squidclamav.spec- Далее необходимо выложить пакеты из папки /root/rpmbuild/RPMS/x86_64 в общедоступное место
Настройка c-icap и squidclamav
- Устанавливаем пакеты для работы c-icap (пакеты были собраны ранее)
# rpm -ivh c-icap-0.3.5-3.1.x86_64.rpm libicapapi3-0.3.5-3.1.x86_64.rpm- Редактируем конфигурационный файл (нужно добавить “Service squidclamav squidclamav.so” и отредактировать параметры производительности)
# diff –ru /etc/c-icap/c-icap.conf.orig /etc/c-icap/c-icap.conf
--- /etc/c-icap/c-icap.conf.orig        2016-07-19 23:29:47.764949235 +0300
+++ /etc/c-icap/c-icap.conf     2016-07-21 02:53:24.650555236 +0300
@@ -55,7 +55,7 @@
 #      generates a number of threads, which serve the requests.
 # Default:
 #      StartServers 3
-StartServers 3
+StartServers 10

 # TAG: MaxServers
 # Format: MaxServers number
@@ -63,7 +63,7 @@
 #      The maximum allowed number of server processes.
 # Default:
 #      MaxServers 10
-MaxServers 10
+MaxServers 70

 # TAG: MinSpareThreads
 # Format: MinSpareThreads number
@@ -72,7 +72,7 @@
 #      the c-icap server starts a new child.
 # Default:
 #      MinSpareThreads     10
-MinSpareThreads     10
+MinSpareThreads     20

 # TAG: MaxSpareThreads
 # Format: MaxSpareThreads number
@@ -81,7 +81,7 @@
 #      the c-icap server kills a child.
 # Default:
 #      MaxSpareThreads     20
-MaxSpareThreads     20
+MaxSpareThreads     50

 # TAG: ThreadsPerChild
 # Format:  ThreadsPerChild number
@@ -89,7 +89,7 @@
 #      The number of threads per child process.
 # Default:
 #      ThreadsPerChild     10
-ThreadsPerChild     10
+ThreadsPerChild     50

 # TAG: MaxRequestsPerChild
 # Format: MaxRequestsPerChild number
@@ -175,7 +175,7 @@
 #      The acceptable range of levels is between 0 and 10.
 # Default:
 #      DebugLevel 1
-DebugLevel 1
+DebugLevel 0

 # TAG: Pipelining
 # Format: Pipelining on|off
@@ -466,7 +466,8 @@
 #      information about the c-icap server.
 # Default:
 #      ServerLog /var/log/c-icap/server.log
-ServerLog /var/log/c-icap/server.log
+# Disabled
+######ServerLog /var/log/c-icap/server.log

 # TAG: AccessLog
 # Format: AccessLog LogFile [LogFormat] [[!]acl1] [[!]acl2] [...]
@@ -481,7 +482,8 @@
 #      AccessLog /var/log/c-icap/access.log
 # Example:
 #      AccessLog /var/log/c-icap/access.log MyFormat all
-AccessLog /var/log/c-icap/access.log
+# Disabled
+#########AccessLog /var/log/c-icap/access.log

 # TAG: Logger
 # Format: Logger LoggerName
@@ -559,7 +561,7 @@
 #      Simple test service
 # Example:
 #      Service echo srv_echo.so
-Service echo srv_echo.so
+Service squidclamav squidclamav.so

 # Module: sys_logger
# Description:- Редактируем систему для правильной установки права на временные файлы
# echo "d /var/run/c-icap 0755 c-icap c-icap -" >/etc/tmpfiles.d/c-icap.conf- Создаем сервис для systemd
cat <<EOF >  /usr/lib/systemd/system/c-icap.service
# create new
[Unit]
Description=c-icap service
After=network.target

[Service]
Type=forking
PIDFile=/var/run/c-icap/c-icap.pid
ExecStart=/usr/bin/c-icap -f /etc/c-icap/c-icap.conf
KillMode=process

[Install]
WantedBy=multi-user.target
EOF- Устанавливаем squidclamav через yum, так как он потянет зависимости
# yum localinstall squidclamav-6.11-2.1.x86_64.rpm- Редактируем конфигурационный файл. Здесь важно, чтобы squidguard был закомментирован
# diff -u /etc/squidclamav.conf.orig /etc/squidclamav.conf
--- /etc/squidclamav.conf.orig  2016-07-19 23:52:25.927974080 +0300
+++ /etc/squidclamav.conf       2016-07-21 02:43:17.838443019 +0300
@@ -18,14 +18,15 @@

 # Path to the squiGuard binary if you want URL filtering, note that you'd better
 # use the squid configuration directive 'url_rewrite_program' instead.
-#squidguard /usr/sbin/squidGuard
+#squidguard /usr/bin/squidGuard

 # Path to the clamd socket, use clamd_local if you use Unix socket or if clamd
 # is listening on an Inet socket, comment clamd_local and set the clamd_ip and
 # clamd_port to the corresponding value.
-clamd_local /var/run/clamav/clamd-socket
-#clamd_ip 192.168.1.5,127.0.0.1
-#clamd_port 3310
+#clamd_local /var/run/clamd.scan/clamd.sock
+clamd_ip 127.0.0.1
+clamd_port 3310
+trust_cache 0

 # Set the timeout for clamd connection. Default is 1 second, this is a good
# value but if you have slow service you can increase up to 3.- ВНИМАНИЕ! При активации опции squidguard сервис squidclamav не сможет инициализироваться
- Запускаем сервис c-icap
# mkdir /var/run/c-icap
# chown c-icap /var/run/c-icap
# systemctl enable c-icap
# systemctl start c-icap
Настройка интеграции squid с c-icap
- Добавляем в конец конфигурационного файла squid
# cat <<EOF >> /etc/squid/squid.conf

# c-icap integration
icap_enable on
icap_send_client_ip on
icap_send_client_username on
icap_client_username_header X-Authenticated-User
icap_service service_req reqmod_precache bypass=1 icap://127.0.0.1:1344/squidclamav
adaptation_access service_req allow all
icap_service service_resp respmod_precache bypass=1 icap://127.0.0.1:1344/squidclamav
adaptation_access service_resp allow all
# end integration
EOF- Перезапускаем squid
# systemctl restart squidНастройка squidGuard
- Мне не удалось поднять этот сервис, так как при указанном в squidclamav c-icap сообщал об ошибке инициализации squidclamav. Возможно, в других ОС или с другими опциями компиляции это будет работать
- Устанавливаем squidGuard
# yum install squidGuard –y- Правим конфигурационный файл /etc/squid/squidGuard.conf
# egrep -v "^#|^$" /etc/squid/squidGuard.conf
dbhome /var/squidGuard/blacklists
logdir /var/log/squidGuard
time workhours {
        weekly mtwhf 08:00 - 16:30
        date *-*-01  08:00 - 16:30
}
rew dmz {
        s@://admin/@://admin.foo.bar.de/@i
        s@://foo.bar.de/@://www.foo.bar.de/@i
}
dest deny {
        domainlist deny/domains
        urllist deny/urls
}
acl {
        default {
                pass     !deny all
                redirect http://admin.foo.bar.de/cgi/blocked?clientaddr=%a+clientname=%n+clientuser=%i+clientgroup=%s+targetgroup=%t+url=%u
        }
}- Создаем необходимые файлы для работы
# mkdir –p /var/squidGuard/blacklists/deny
# cat /var/squidGuard/blacklists/deny/domains
yahoo.co.in
example.com
# cat /var/squidGuard/blacklists/deny/urls
#write URLs you’d like to prohibit to access
http://www.yahoo.co.in
http://www.sathish.com- Пересобираем базу
# chown -R squid. /var/squidGuard/blacklists/deny/
# squidGuard -C all- Проверяем, что данные доступны
# ls -l /var/squidGuard/blacklists/deny/*.db
-rw-r--r--. 1 root root 8192 Jul 19 22:09 /var/squidGuard/blacklists/deny/domains.db
-rw-r--r--. 1 root root 8192 Jul 19 22:09 /var/squidGuard/blacklists/deny/urls.db
# file /var/squidGuard/blacklists/deny/domains.db
/var/squidGuard/blacklists/deny/domains.db: Berkeley DB (Btree, version 9, native byte-order)
Настройка dansguarian
- Устанавливаем dansguardian (был собран ранее)
# rpm -ivh dansguardian-2.12.0.3-1.1.x86_64.rpm- Правим конфигурационный файл
# vi /etc/dansguardian/dansguardian.conf
…
accessdeniedaddress = 'http://127.0.0.1/cgi-bin/dansguardian.pl'
…- Добавляем в автозагрузку и запускаем
# /etc/init.d/dansguardian start
# chkconfig dansguardian on- Если требуется, то можем настроить категории и
списки фильтрации
# ls -l /etc/dansguardian/lists/
total 140
drwxr-xr-x.  2 root root   21 Jul 20 01:13 authplugins
-rw-r--r--.  1 root root 4950 Jul 20 01:38 bannedextensionlist
-rw-r--r--.  1 root root  500 Jul 19 21:15 bannediplist
-rw-r--r--.  1 root root  284 Jul 19 21:15 bannedmimetypelist
-rw-r--r--.  1 root root 1958 Jul 19 21:15 bannedphraselist
-rw-r--r--.  1 root root  321 Jul 19 21:15 bannedregexpheaderlist
-rw-r--r--.  1 root root 5229 Jul 19 21:15 bannedregexpurllist
drwxr-xr-x.  2 root root   20 Jul 20 01:13 bannedrooms
-rw-r--r--.  1 root root 4985 Jul 19 21:15 bannedsitelist
-rw-r--r--.  1 root root 2640 Jul 19 21:15 bannedurllist
drwxr-xr-x.  3 root root   16 Jul 20 01:13 blacklists
-rw-r--r--.  1 root root 4979 Jul 19 21:15 contentregexplist
drwxr-xr-x.  2 root root 4096 Jul 20 01:13 contentscanners
drwxr-xr-x.  2 root root   59 Jul 20 01:13 downloadmanagers
-rw-r--r--.  1 root root  480 Jul 19 21:15 exceptionextensionlist
-rw-r--r--.  1 root root  912 Jul 19 21:15 exceptionfilesitelist
-rw-r--r--.  1 root root  834 Jul 19 21:15 exceptionfileurllist
-rw-r--r--.  1 root root  708 Jul 19 21:15 exceptioniplist
-rw-r--r--.  1 root root  653 Jul 19 21:15 exceptionmimetypelist
-rw-r--r--.  1 root root  538 Jul 19 21:15 exceptionphraselist
-rw-r--r--.  1 root root  335 Jul 19 21:15 exceptionregexpurllist
-rw-r--r--.  1 root root 1275 Jul 19 21:15 exceptionsitelist
-rw-r--r--.  1 root root  361 Jul 19 21:15 exceptionurllist
-rw-r--r--.  1 root root  194 Jul 19 21:15 filtergroupslist
-rw-r--r--.  1 root root 1910 Jul 19 21:15 greysitelist
-rw-r--r--.  1 root root  902 Jul 19 21:15 greyurllist
-rw-r--r--.  1 root root  616 Jul 19 21:15 headerregexplist
-rw-r--r--.  1 root root  623 Jul 19 21:15 logregexpurllist
-rw-r--r--.  1 root root  596 Jul 19 21:15 logsitelist
-rw-r--r--.  1 root root  591 Jul 19 21:15 logurllist
drwxr-xr-x. 36 root root 4096 Jul 20 01:13 phraselists
-rw-r--r--.  1 root root 2743 Jul 19 21:15 pics
-rw-r--r--.  1 root root 2887 Jul 19 21:15 urlregexplist
-rw-r--r--.  1 root root 6524 Jul 19 21:15 weightedphraselist
# cat /etc/dansguardian/lists/bannedsitelist |egrep -v "^#|^$"
badboys.com
.Include</etc/dansguardian/lists/blacklists/ads/domains>
Настройка веб сервера Apache
- Устанавливаем пакеты
# yum install httpd- Запускаем и добавляем в автозагрузку
# systemctl enable httpd
# systemctl start httpd- Копируем скрипты от squidclamav в CGI директорию
# cp /srv/www/cgi-bin/clwarn.cgi* /var/www/cgi-bin/Проверка работоспособности
- Прописываем параметры прокси сервера у себя в веб-брауззере
— Адрес: маршрутизируемый адрес вашего сервера
— Порт: 8080 (порт Dansguardian) - Пробуем подключаться к веб-сайтам (должно работать)
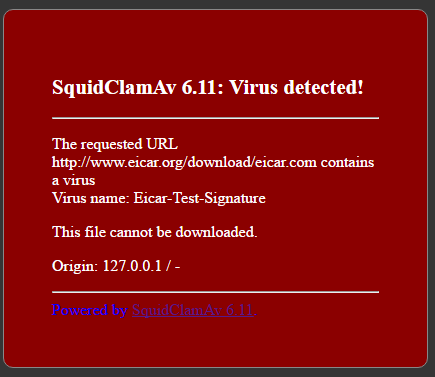
- Пробуем скачать тестовый вирус eicar. Здесь вы должны увидеть следующее сообщение:

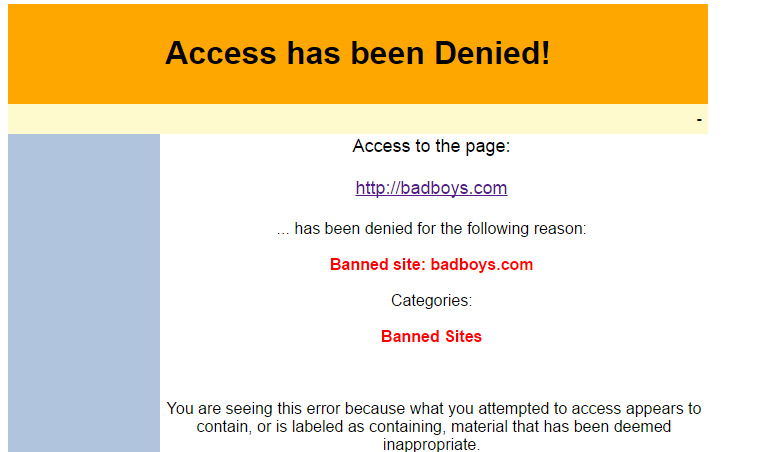
- Пробуем открыть запрещенные ссылки (http://badboys.com). Должны увидеть следующее сообщение от Dansguardian:

Заключение
Данная статья показывает, что настройка связки прокси сервера squid с антивирусным ПО ClamAV является несложным занятием, которое под силу даже начинающему администратору Linux/Unix.
Автор artemii
Автор: Bell Integrator


