День добрый! В данной статье я хочу обсудить такой важный вопрос как шрифты в Android. Мы создадим свой TextView с возможностью добавлять шрифты в xml и визуально их отображать в превью. Так же решим одну важную проблему – использование шрифтов в списке, без глюков и напрягов для братьев наших меньших, наших Android-устройств.
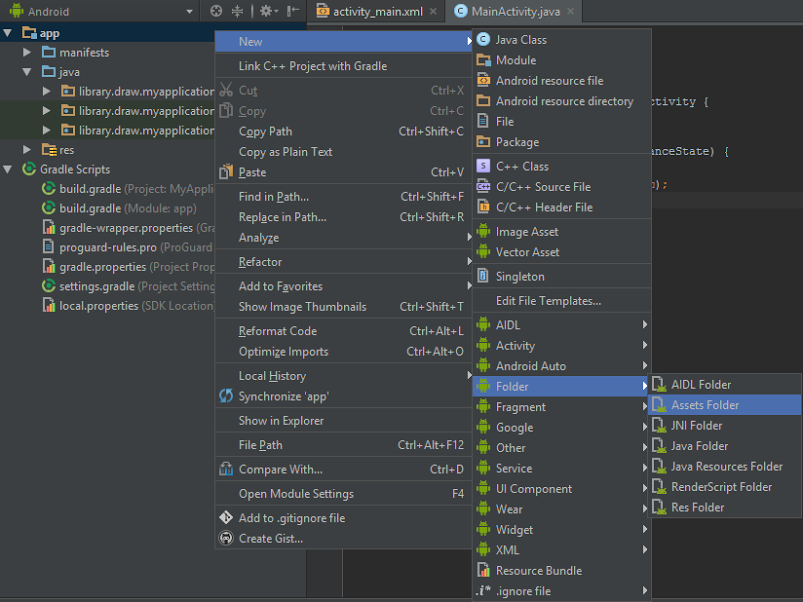
Дальше я распишу как создать папку assets и добавлять свои шрифты, так что это можно пропустить.
appsrcmainassets
Либо более простым способом

Дальше файлы с форматом .ttf закидываем в assets либо в корень, либо создаем папку fonts, так как assets поддерживает вложенность.
Итак, теперь собственно обратимся к реализации использования шрифтов для TextView, в чистом виде выглядит приблизительно следующим образом:
  Typeface type = Typeface.createFromAsset(getAssets(),"fonts/font1.ttf");
  myTextView.setTypeface(type);
Когда дело касается более чем пяти TextView, этот процесс начинает раздражать. Но раздражение — это не единственная проблема с которой встречается разработчик, использующий данную конструкцию. Дело в том, что сама обработка файла шрифта и превращение его в объект Typeface довольно трудоемкий процесс, следовательно, использование подобной конструкции в листе вызовет неимоверные глюки.
Данную задачу я предлагаю решить обычным сингтоном. И так создаем что-то похожее:
public class SingletonFonts {
    private static Typeface font1;
    private static Typeface font2;
    private static Typeface font3;

    public Typeface getFont1() {
        return font1;
    }

    public  Typeface getFont2() {
        return font2;
    }

    public Typeface getFont3() {
        return font3;
    }


    public static void setFont1(Typeface font1) {
        SingletonFonts.font1 = font1;
    }

    public static void setFont2(Typeface font2) {
        SingletonFonts.font2 = font2;
    }

    public static void setFont3(Typeface font3) {
        SingletonFonts.font3 = font3;
    }

    private static volatile SingletonFonts instance;

    private SingletonFonts() {}

    public static SingletonFonts getInstance(Context activity) {
        SingletonFonts localInstance = instance;
        if (localInstance == null) {
            synchronized (SingletonFonts.class) {
                localInstance = instance;
                if (localInstance == null) {
                    instance = localInstance = new SingletonFonts();
                }
            }
            setFont1(Typeface.createFromAsset(activity.getAssets(), "fonts/font1.ttf"));
            setFont2(Typeface.createFromAsset(activity.getAssets(), "fonts/font2.ttf"));
            setFont3(Typeface.createFromAsset(activity.getAssets(), "fonts/font3.ttf"));

        }
        return localInstance;
    }


}
И устанавливаем шрифты используя синглтон, вот так:
public class MainActivity extends AppCompatActivity {
    TextView textView1;
    TextView textView2;
    TextView textView3;
    @Override
    protected void onCreate(Bundle savedInstanceState) {
        super.onCreate(savedInstanceState);
        setContentView(R.layout.activity_main);
        textView1 = (TextView) findViewById(R.id.text_view_1);
        textView2 = (TextView) findViewById(R.id.text_view_2);
        textView3 = (TextView) findViewById(R.id.text_view_3);

        textView1.setTypeface(SingletonFonts.getInstance(this).getFont1());
        textView2.setTypeface(SingletonFonts.getInstance(this).getFont2());
        textView3.setTypeface(SingletonFonts.getInstance(this).getFont3());

    }
}
Используя данную конструкцию мы решили вторую проблему, по поводу лагов в листе, но не первую, самую важную, вам все так же нужно находить все текстовые поля и на все снова и снова сетить шрифты, писать отдельные методы и терять нервные клетки. Еще одна проблема в том, что в привью — стандартный шрифт, следовательно ширину, высоту своего шрифта. вы можете увидеть только на живом девайсе или эмуляторе, это очень не удобно.
Введу выше указанных проблем мы сейчас напишем свой TextView с блэкджеком и шрифтами.
Первым делом создаем класс наследник обычного TextView с конструкторами:
public class CustomFontsTextView extends TextView {
    public CustomFontsTextView(Context context) {
        super(context);
    }

    public CustomFontsTextView(Context context, AttributeSet attrs) {
        super(context, attrs);
    }

    public CustomFontsTextView(Context context, AttributeSet attrs, int defStyleAttr) {
        super(context, attrs, defStyleAttr);
    }

    public CustomFontsTextView(Context context, AttributeSet attrs, int defStyleAttr, int defStyleRes) {
        super(context, attrs, defStyleAttr, defStyleRes);
    }

}
Дальше создаём в папке values файл attrs.xml
и создаем файл с названием attrs.xml, после создания он должен выглядеть примерно следующим образом:
<?xml version="1.0" encoding="utf-8"?>
<resources>

</resources>
В нем создаем следующий блок кода:
  //имя вашего класса
    <declare-styleable name="CustomFontsTextView">
        // перечень всех ваших шрифтов. name = "fonts" - название xml атрибута
        <attr name="fonts" format="enum">
            <enum name="font1" value="0"/>
            <enum name="font2" value="1"/>
            <enum name="font3" value="2"/>
        </attr>
    </declare-styleable>
Дальше возвращаемся в наш класс CustomFontsTextView и пишем вот такой метод:
   public class CustomFontsTextView extends TextView {
    public CustomFontsTextView(Context context) {
        super(context);
    }

    public CustomFontsTextView(Context context, AttributeSet attrs) {
        super(context, attrs);
        setFonts(attrs,context);
    }

    public CustomFontsTextView(Context context, AttributeSet attrs, int defStyleAttr) {
        super(context, attrs, defStyleAttr);
        setFonts(attrs,context);
    }

    public CustomFontsTextView(Context context, AttributeSet attrs, int defStyleAttr, int defStyleRes) {
        super(context, attrs, defStyleAttr, defStyleRes);
        setFonts(attrs,context);
    }


    private void setFonts(AttributeSet attributeSet, Context context){
        TypedArray a = context.getTheme().obtainStyledAttributes(
                attributeSet,
                R.styleable.CustomFontsTextView,
                0, 0);
        int fonts = a.getInt(R.styleable.CustomFontsTextView_fonts,-1);
        SingletonFonts singltonFonts = SingletonFonts.getInstance(context);
        switch (fonts){
            case (0):
                setTypeface(singltonFonts.getFont1());
                break;
            case (1):
                setTypeface(singltonFonts.getFont2());
                break;
            case (2):
                setTypeface(singltonFonts.getFont3());
                break;
        }
    }
}
Вот собственно и все. Теперь нужно перебилдить проект, чтобы у вас появились кастомные атрибуты. После этого отправляемся в xml файл нашей активити и пишем:
<?xml version="1.0" encoding="utf-8"?>
<LinearLayout xmlns:android="http://schemas.android.com/apk/res/android"
    xmlns:tools="http://schemas.android.com/tools"
    xmlns:app="http://schemas.android.com/apk/res-auto"
    android:id="@+id/activity_main"
    android:layout_width="match_parent"
    android:layout_height="match_parent"
    android:orientation="vertical"
    tools:context="library.draw.myapplication.MainActivity">

    <library.draw.myapplication.CustomFontsTextView
        android:layout_width="wrap_content"
        android:layout_height="wrap_content"
        android:layout_gravity="center_horizontal"
        android:layout_margin="16dp"
        app:fonts="font1"
        android:textSize="24sp"
        android:id="@+id/text_view_1"
        android:text="Hello World!" />
    <library.draw.myapplication.CustomFontsTextView
        android:layout_width="wrap_content"
        android:layout_height="wrap_content"
        android:layout_gravity="center_horizontal"
        android:layout_margin="16dp"
        android:textSize="48sp"
        app:fonts="font2"
        android:id="@+id/text_view_2"
        android:text="Hello World!" />
    <library.draw.myapplication.CustomFontsTextView
        android:layout_width="wrap_content"
        android:layout_height="wrap_content"
        android:layout_gravity="center_horizontal"
        android:layout_margin="16dp"
        android:textSize="24sp"
        app:fonts="font3"
        android:id="@+id/text_view_3"
        android:text="Hello World!" />

</LinearLayout>
В привью мы увидим уже полностью готовые текстовые поля с нашими шрифтами.

Обращаться к нашим кастомным текстовым полям лучше как к обычному TextView, по стандартной форме:
TextView textView = (TextView) findViewById(R.id.text_view_1);Спасибо за внимание.
Автор: palamarenco


